Festival Ready Makeup Look

How to Create a Festival Ready Makeup Look

Introduction: Festival season is a time for self-expression, creativity, and embracing bold, vibrant looks. Whether you’re heading to a music festival or simply looking to unleash your inner artist, creating a festival ready makeup look is an exciting adventure. In this blog, we’ll guide you through the steps to achieve a stunning festival makeup look that’s bound to make you stand out in the crowd. Get ready to rock the festival scene with insights from the best makeup artist.

Start with a Hydrating Base

Festival makeup often involves long hours and dancing, so begin with a hydrating primer to keep your makeup in place. Apply a lightweight, long-wear foundation or a tinted moisturizer for a fresh and comfortable base.

Embrace Glitter and Shimmer

Festivals are the perfect opportunity to go all out with glitter and shimmer. Apply a glitter primer to your eyelids and add vibrant, shimmering eyeshadows for a captivating eye look. Don’t forget to apply body glitter or shimmer to your collarbone, shoulders, and even hair for extra festival flair.

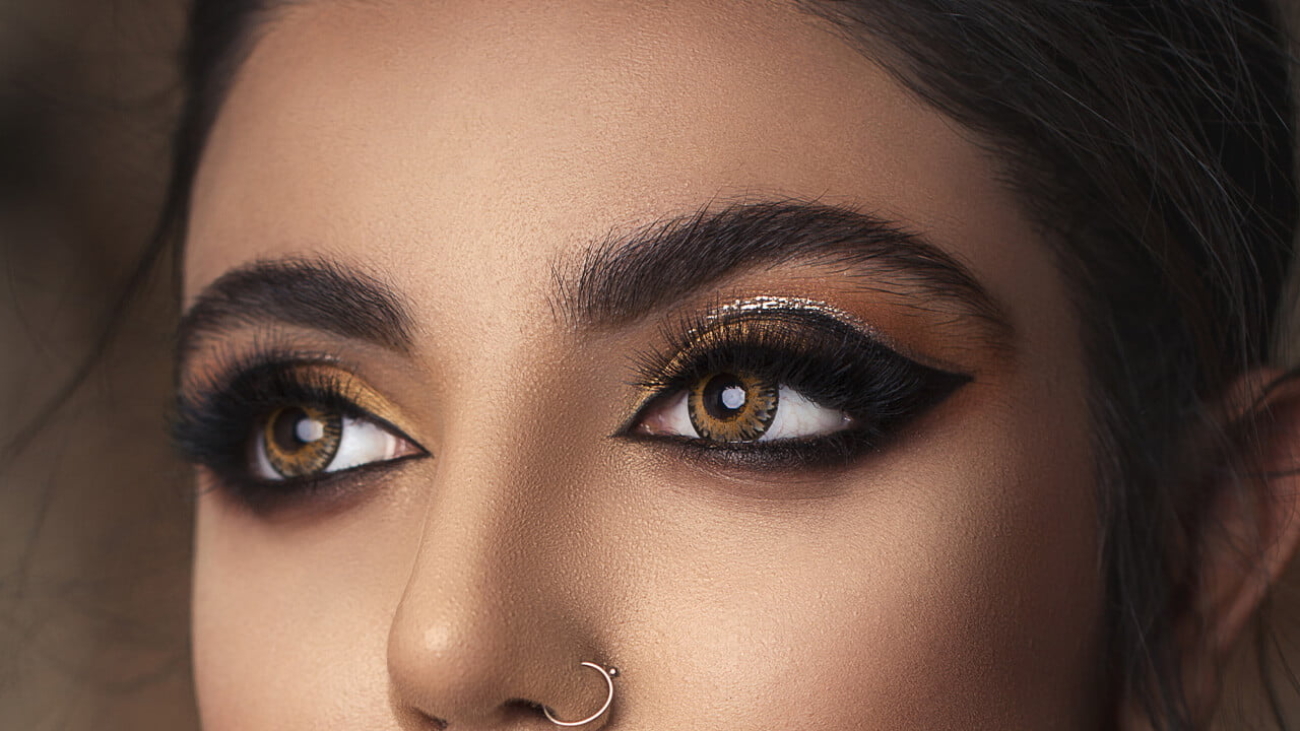
Create Bold Eye Makeup

Bold eye makeup is a festival staple. Consider using bright and colorful eyeshadows, creating graphic liner designs, or adding neon accents to make your eyes pop. Waterproof mascara is a must to withstand sweat and tears of joy.

Define Your Brows

Well-groomed brows frame your face and complete your festival makeup look. Use a waterproof brow product to define and shape your brows, ensuring they stay put throughout the day.

Add Face Gems and Rhinestones

Face gems and rhinestones are a festival favorite for creating a whimsical and eye-catching look. Place them strategically on your face, around your eyes, or on your forehead for a touch of sparkle and magic.
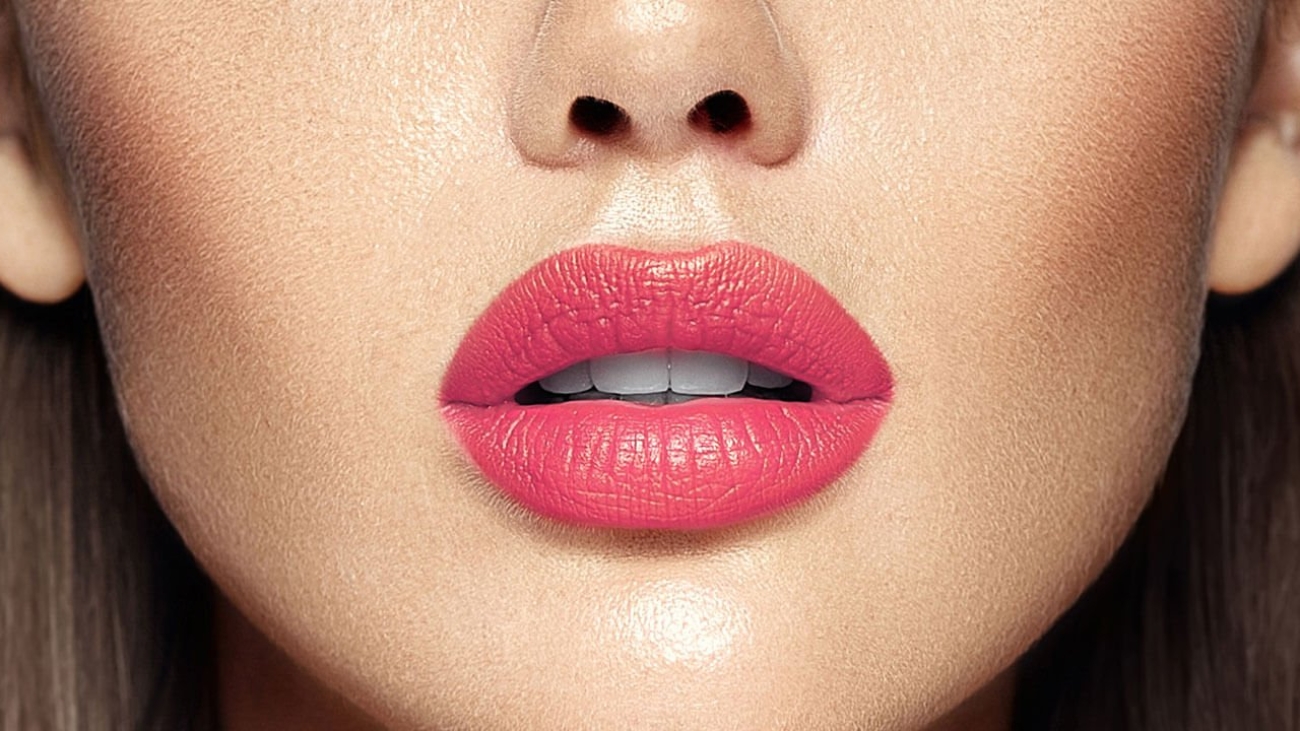
Go for Bold Lips

Festival makeup allows you to experiment with bold lip colors. Choose vibrant shades like neon pinks, deep purples, or electric blues to make a statement. Long-lasting liquid lipsticks or lip stains are ideal for all-day wear.

Set with Setting Spray

To ensure your festival makeup stays put, use a setting spray designed for long-lasting wear. This will help prevent smudging and keep your makeup looking fresh throughout the festivities.

Keep It Fun and Creative

Festival makeup is all about creativity and self-expression, so don’t be afraid to try new looks and techniques. Experiment with face paint, temporary tattoos, and unique makeup designs to showcase your personality.

Consider a Makeup Artist Course

If you’re passionate about makeup and dream of becoming a professional makeup artist, consider enrolling in a makeup artist course. Expert training can provide you with the skills and knowledge to excel in the world of beauty, including creating festival-ready makeup looks.

Conclusion

Creating a festival-ready makeup look is a chance to let your creativity shine. With bold colors, shimmering accents, and a sense of adventure, you can achieve a stunning and unique look that’s perfect for celebrating music, art, and culture at festivals. Whether you’re a festival-goer or an aspiring makeup artist, mastering the art of festival makeup is a fantastic way to showcase your talent and embrace the spirit of these vibrant events. Get ready to dance, celebrate, and turn heads with your festival makeup masterpiece!

bold lip look

How to Create a Bold Lip Look

A bold lip look can be a showstopper, adding drama and confidence to your overall appearance. Whether you’re a makeup enthusiast or dreaming of becoming a professional makeup artist, mastering the art of creating bold lip looks is a valuable skill. In this blog, we’ll guide you through the steps to achieve a striking lip look that turns heads. Let’s explore the world of bold lips with insights from the best makeup artist.

Prep Your Lips

Before you dive into creating a bold lip look, it’s essential to prepare your lips. Exfoliate gently using a lip scrub or a toothbrush to remove any dead skin. Follow up with a hydrating lip balm to ensure a smooth canvas for your bold lip color.

Choose the Right Lip Color

Selecting the perfect bold lip color is crucial. Bold shades like red, berry, or deep plum can make a statement. Consider your skin tone and undertone when choosing the shade to ensure it complements your complexion.

Use Lip Liner

Lip liner is your secret weapon for achieving a precise and long-lasting bold lip look. Start by outlining your lips, following your natural lip shape. If you want to create the illusion of fuller lips, you can slightly overline them but do so sparingly for a natural effect.

Fill in with Lipstick

Once your lips are outlined, fill them in with your chosen bold lipstick shade. Use a lip brush or the lipstick itself for more control and precision. Building up the color in layers can help achieve a rich and even finish.

Blot and Reapply

After applying the first layer of lipstick, blot your lips with a tissue to remove any excess product. This step helps set the color and ensures longevity. Then, reapply another layer of lipstick for a vibrant finish.

Clean Up the Edges

To achieve a crisp and clean bold lip look, take a small concealer brush or a cotton swab dipped in concealer to tidy up the edges. This step also helps define the lip shape.

Consider Lip Gloss

For added dimension and shine, you can apply a clear or matching lip gloss to the center of your lips. This gives your bold lip look an extra pop and creates the illusion of fuller lips.

Don’t Forget the Rest of Your Makeup

To balance your bold lip look, keep the rest of your makeup subtle. Soft eye makeup and well-groomed brows work well to highlight your lips without overwhelming your face.

Practice Makes Perfect

Creating a bold lip look takes practice, so don’t be discouraged if it doesn’t turn out perfectly the first time. Experiment with different shades and techniques to find what works best for you.

Consider a Makeup Artist Course

If you’re passionate about makeup and aspire to become a makeup artist, consider enrolling in a makeup artist course. Professional training can provide you with advanced skills and industry insights from the best makeup artists.

Conclusion

Creating a bold lip look is an art that can transform your entire appearance. With the right shade, technique, and a little practice, you can achieve a striking lip look that exudes confidence and style. Whether you’re a makeup enthusiast or pursuing a career as a makeup artist, mastering the art of bold lips is a skill that will set you apart in the world of beauty.


Best Makeup Tips

The Best Makeup Tips for Older Women

Aging gracefully is a beautiful journey, and makeup can enhance your natural beauty at any age. Whether you’re a mature makeup enthusiast or considering a makeup artist course, knowing the best makeup tips for older women is essential. In this blog, we’ve gathered insights from the best makeup artists to help you achieve a radiant and youthful look. Let’s dive into the world of makeup and discover the secrets to enhancing your mature beauty.

Hydration is Key

As you age, your skin tends to become drier. Start your makeup routine with a hydrating primer or moisturizer to ensure a smooth canvas for makeup application. Best makeup artists recommend using products with hyaluronic acid to lock in moisture.

Choose a Lightweight Foundation

Opt for a lightweight, hydrating foundation that provides coverage without settling into fine lines and wrinkles. Look for foundations labeled as “dewy” or “hydrating” for a youthful glow.

Conceal with Care

Concealer is your best friend when it comes to hiding imperfections, but avoid using it excessively. Best makeup artists suggest applying concealer sparingly to avoid emphasizing fine lines. Choose a concealer that matches your foundation shade for a seamless blend.

Focus on the Eyes

Eye makeup can transform your look. Consider using an eyeshadow primer to prevent creasing, and opt for matte or satin eyeshadows to minimize shimmer settling into creases. Don’t forget to curl your lashes and apply mascara to open up your eyes.

Eyebrows Matter

Well-groomed eyebrows frame your face and give a more youthful appearance. Use a brow pencil or powder to fill in sparse areas, following your natural brow shape. Best makeup artists recommend using a shade slightly lighter than your natural brow color for a softer look.

Embrace Cream Blush

Cream blushes are fantastic for mature skin as they provide a natural flush and a dewy finish. Dab a small amount on the apples of your cheeks and blend for a youthful radiance.

Lip Liner is Your Friend

Lipstick bleeding into fine lines can be a concern. To prevent this, use a lip liner to define your lips and keep your lipstick in place. Choose a lipstick with a satin or creamy finish for a more youthful effect.

Set with a Finishing Powder

A lightweight, translucent finishing powder can help set your makeup and minimize shine without drying out your skin. Best makeup artists advise using a light hand and avoiding excessive powder, which can settle into wrinkles.

Experiment with Makeup Artist Techniques

Consider taking a makeup artist course to learn advanced techniques tailored to mature skin. Professional makeup artists are skilled in addressing specific challenges and can provide personalized guidance.

Conclusion

Makeup is an art that can enhance your natural beauty at any age. These best makeup tips for older women, gathered from makeup artists, are designed to help you look and feel your best. Remember, makeup should be fun and empowering, so don’t hesitate to experiment and find what works best for you. Whether you’re a makeup enthusiast or aspiring makeup artist, these tips will help you embrace the beauty of aging while looking and feeling your best.

Right Foundation for Skin

How to Choose the Right Foundation for Skin Type

Introduction: Choosing the right foundation for skin type can be a game-changer in your makeup routine. The right foundation not only enhances your natural beauty but also provides a flawless canvas for the rest of your makeup. To help you make the best choice, we’ve consulted some of the best makeup artist in the industry. In this blog, we’ll share their expert insights on finding the perfect foundation for your skin type. Whether you’re a makeup enthusiast or considering a makeup artist course, these tips are invaluable.

1.Know Your Skin Type: Before you start your hunt for the perfect foundation, it’s crucial to understand your skin type. The most common skin types are oily, dry, combination, and sensitive. Best makeup artists emphasize that choosing a foundation tailored to your skin type is the first step to achieving a flawless look.

2.Determine Your Undertone: Understanding your undertone is equally important. Foundations come in warm, cool, and neutral undertones. To find your undertone, check the veins on your wrist: blue veins indicate cool undertones, green veins suggest warm undertones, and a mix of both suggests neutral undertones.

3.Coverage Level: Different occasions call for different levels of coverage. If you want a natural, everyday look, opt for a light coverage foundation. For more coverage and special events, consider medium or full coverage options. Makeup artists recommend keeping a variety of foundations in your makeup kit to suit various needs.

4.Test the Shade in Natural Light: Always test foundation shades in natural light to ensure a perfect match. Experts advise applying a few shades on your jawline and selecting the one that disappears into your skin seamlessly. Don’t forget to blend it down your neck for a seamless transition.

5.Consider Your Skin’s Needs: If you have specific skin concerns like acne, fine lines, or uneven texture, look for foundations that cater to these needs. Best makeup artists often use foundations with added skincare benefits, such as hyaluronic acid for hydration or salicylic acid for acne-prone skin.

6.Foundation Formulas: Foundations come in various formulas, including liquid, powder, cream, and stick. Your choice should depend on your skin type and personal preference. For instance, liquid foundations work well for dry skin, while powder foundations are great for oily skin.

7.Seek Professional Guidance: If you’re serious about makeup and considering a makeup artist course, it’s wise to consult with a professional makeup artist. They can provide personalized recommendations based on your unique features and career goals. Additionally, they can introduce you to high-quality products favored by the industry.

Conclusion: Choosing the right foundation for your skin type is an art, and the guidance of the best makeup artists can be invaluable. By understanding your skin type, undertone, and coverage needs, as well as seeking professional advice, you can ensure that your foundation enhances your beauty and boosts your confidence. Whether you’re a makeup enthusiast or aspiring makeup artist, these tips will set you on the path to success in the world of beauty.

Remember, the journey to finding the perfect foundation may take some trial and error, but with patience and the right knowledge, you’ll achieve a flawless finish every time.

Best Makeup Looks

The Best Makeup Looks for Brunettes: Unleash Your Beauty Potential

Brunettes, your gorgeous hair deserves makeup looks that enhance your natural beauty and complement your stunning features. In this guide, we’ll explore the best makeup looks tailored for brunettes. Whether you’re seeking the best makeup artist to help you achieve these looks or considering a makeup artist course to master the art yourself, we’ve got you covered. Let’s dive into these versatile makeup styles designed to make your eyes sparkle, your skin glow and your confidence soar.

1. Classic Nude Makeup

Start with a flawless base, using a foundation that matches your skin tone. Enhance your eyes with neutral eyeshadows, add a coat of mascara, and finish with a nude lip color. This timeless look accentuates your natural beauty and is perfect for everyday elegance.

2. Smoky Eyes for Drama

Elevate your evening look with sultry smoky eyes. Use earthy tones like deep browns or plum shades to create a mesmerizing effect. A smoky eye pairs beautifully with a nude or bold lip color, depending on your preference.

3. Bold Red Lips

A classic red lip is a showstopper for brunettes. Choose a red shade that complements your undertone (cool or warm) and keep the rest of your makeup understated to let your lips steal the spotlight.

4. Sun-Kissed Glow

Embrace a sun-kissed complexion with bronzer and warm blush. For your eyes, opt for earthy tones like terracotta or bronze. Finish with a glossy lip for a radiant and natural look.

5. Earthy and Matte

Matte makeup is both trendy and flattering for brunettes. Use matte eyeshadows in shades like taupe, dusty rose, or mauve. Pair this with a matte lipstick in a complementary color for a chic and modern appearance.

6. Winged Eyeliner Elegance

Achieve a timeless and sophisticated look with winged eyeliner. This style enhances your eyes and adds a touch of glamour to any occasion. Consider enrolling in a makeup artist course to master the art of the perfect winged liner.

7. Berry Hues for Depth

Brunettes can experiment with deeper, berry-toned makeup. These shades bring out the richness of your hair color. Try berry eyeshadows, blush, and a matching lip color for a harmonious look.

8. Golden Goddess

For a touch of opulence, embrace golden eyeshadows, and highlighters. These shades complement your brunette locks beautifully and add a touch of luxury to your makeup routine.

Conclusion: Elevate Your Brunette Beauty

Brunettes have a world of makeup looks at their disposal, and these options are just the beginning. Whether you’re seeking the expertise of the best makeup artist or considering a makeup artist course to hone your skills, these makeup looks can help you enhance your natural beauty and express your unique style. Experiment, have fun, and let your makeup highlight the stunning allure of your brunette locks. With the right makeup techniques, you’ll be ready to turn heads and radiate confidence wherever you go.

perfect cat eye look

Get the Perfect Cat Eye With Mastering the Art of Eye Makeup

The timeless allure of the cat-eye makeup look has endured for decades, and it remains a classic choice for various occasions, from everyday elegance to dramatic smoky eyes for a party makeup look. In this guide, we’ll unveil the secrets to achieving the perfect cat eye, ensuring your eyes are the focal point of your beauty. Whether you’re a budding makeup enthusiast or considering a makeup artist course to elevate your skills, this tutorial will help you create a stunning cat-eye makeup look that’s bound to turn heads.

Step 1: Gather Your Essential Tools

Before you dive into creating the cat eye, ensure you have the necessary tools within reach:

  • Liquid eyeliner or gel eyeliner with an eyeliner brush
  • Eyeshadow primer
  • Eyeshadow palette (optional, for a smoky eye effect)
  • Cotton swabs and makeup remover for cleanup
  • A steady hand and a touch of patience

Step 2: Prepare Your Canvas

Begin by applying eyeshadow primer to your eyelids. This step not only ensures your eyeshadow stays in place but also provides a smooth base for your eyeliner.

Step 3: Create the Base Line

To achieve the perfect cat eye, start by drawing a thin line along your upper lash line, following its natural curve. You can use either a liquid or gel eyeliner for this step. If you’re going for a smoky eye, apply a neutral eyeshadow shade over your eyelids before creating the base line.

Step 4: Extend the Flick

The hallmark of a cat eye is the elongated flick at the outer corner of the eye. Imagine an invisible line extending from the outer corner of your lower lash line towards your temple. Use this as a guide to draw the flick, angling it upwards to your desired level of drama. Whether you prefer a subtle or dramatic cat eye, the key is precision.

Step 5: Connect and Fill

Now, connect the flick you’ve created to the base line. This step forms the classic cat-eye shape. Fill in the triangle you’ve formed, ensuring a smooth and even line.

Step 6: Refine and Perfect

Take a step back and assess your cat eye. Make any necessary adjustments to ensure both eyes match. Cotton swabs dipped in makeup remover can help with precise cleanup and achieving symmetry.

Step 7: Complement with a Smoky Eye (Optional)

For a party makeup look or a more dramatic effect, consider adding a smoky eye. Use your eyeshadow palette to apply darker shades to the crease and outer corners of your eyes, blending them seamlessly for a sultry finish.

Conclusion: Elevate Your Eye Makeup Skills

Mastering the cat-eye makeup look is a rewarding skill that can transform your everyday makeup or take your party makeup look to the next level. Whether you’re practicing for personal glam or considering a makeup artist course to refine your expertise, this classic technique is a must-have in your repertoire. Perfecting the cat eye requires practice, so don’t be discouraged if it takes a few attempts to achieve your desired result. With patience and dedication, you’ll soon be creating cat eyes that exude confidence and charm.

makeup trends

The Top 10 Makeup Trends for Spring 2023

As the flowers bloom and the days grow longer, the world of makeup is also experiencing a delightful transformation. Spring 2023 brings with it a burst of creativity, colors, and trends that are poised to refresh your beauty routine. Whether you’re a makeup enthusiast or a professional seeking to stay at the forefront of the industry, these top 10 makeup trends are not to be missed. Join us as we explore the latest in makeup artistry and dive into the hues, techniques, and styles that are set to define this vibrant season.


1. Bold and Bright Eyeliner:

Spring 2023 is all about making a statement with your eyes. Bold and bright eyeliners in shades like electric blue, neon green, and fiery orange are taking center stage. Experiment with graphic shapes and daring winged liners to showcase your creativity.

2. The Return of Nude Makeup:

While bold liners steal the spotlight, the nude makeup trend is making a comeback. Embrace natural beauty with minimal foundation, soft eyeshadows, and a touch of peachy blush. It’s all about letting your skin shine through.

3. Glitter Everywhere:

Glitter isn’t just for special occasions anymore. Spring 2023 encourages you to sprinkle a little sparkle into your daily routine. Apply shimmering eyeshadow, highlighter, or even glittery lips for a touch of everyday glam.

4. Monochromatic Magic:

Simplify your makeup routine with monochromatic looks. Choose a single shade and apply it to your eyes, cheeks, and lips for a harmonious and effortlessly chic appearance.

5. Watercolor Eyes:

Think soft pastels and ethereal washes of color. Watercolor eyes create a dreamy and romantic look. Blend delicate shades like lavender, baby blue, and pale pink for a whimsical effect.

6. Glossy Lips Are Back:

Bid farewell to matte lips; glossy lips are making a triumphant return. Shiny, luscious lips in shades of coral, peach, and sheer red are perfect for capturing the spirit of spring.

7. Feathered Brows:

Natural, feathered brows are here to stay. Ditch the heavy brow products and embrace your brows’ natural texture. Lightly fill in any gaps for a polished yet undone look.

8. Underliner Accents:

Take your eye makeup to the next level with underliner accents. Line your lower lash line with colorful or metallic shades to add a pop of intrigue to your look.

9. Dewy Skin:

Healthy, dewy skin is always in style, but it’s particularly emphasized this spring. Achieve a luminous complexion with hydrating primers, dewy foundations, and a touch of liquid highlighter.

10. Statement Lashes:

Don’t forget about your lashes. Spring 2023 calls for dramatic, statement lashes. Whether you opt for voluminous mascara or bold falsies, make your lashes a focal point.

Conclusion: Stay Ahead with the Best Makeup Trends

Spring 2023 is a season of experimentation and celebration in the world of makeup. From bold eyeliners to the return of glossy lips, these top 10 makeup trends offer a palette of options to express your unique style. Aspiring makeup artists, take note: staying updated with the latest trends is essential in this ever-evolving industry. If you’re passionate about makeup trends and beauty, consider enrolling in a makeup artist course to refine your skills and become the best makeup artist you can be.

Embrace these trends, adapt them to your personal style, and have fun exploring the vibrant and ever-changing world of makeup. With these trends as your guide, you’ll be ready to greet spring 2023 with a fresh and fashionable face.

Smoky Eye Look

How to Create a Sophisticated Smoky Eye Look That’s Perfectly Office-Ready

The smoky eye look has long been a makeup staple for its sultry and dramatic allure. However, the classic smoky eye can sometimes feel too bold for the workplace. But what if we told you that you could achieve a smoky eye that’s both alluring and work-appropriate? In this comprehensive guide, we’ll walk you through the steps to create a sophisticated and office-friendly smoky eye that’s sure to turn heads without raising eyebrows. Whether you’re a makeup novice or a beauty enthusiast, these easy-to-understand steps will help you master the art of the subtle smoky eye for professional settings. Let’s dive in.

Step 1: Assemble Your Essential Tools and Makeup Products

Before you embark on your journey to creating the perfect office-appropriate smoky eye, it’s crucial to ensure that you have all the necessary tools and products at your disposal:

  • High-quality eyeshadow primer
  • A versatile neutral eyeshadow palette (matte shades are highly recommended)
  • An eyeliner in a subtle shade such as brown or gray
  • A trusty mascara
  • An array of makeup brushes, including a fluffy blending brush, a flat eyeshadow brush, and an eyeliner brush
  • Cotton swabs (for precise cleanup)
  • A reliable makeup remover (just in case you need to make any adjustments)

Step 2: Begin with a Fresh Canvas

Before applying any makeup, start with a clean and well-moisturized face. Gently apply a thin layer of eyeshadow primer to your eyelids. This step serves a dual purpose: it creates a smooth base for your eyeshadow and ensures your eye makeup lasts throughout the day.

Step 3: The Right Choice of Eyeshadow Shades

To achieve a work-appropriate smoky eye, focus on selecting neutral shades. Earthy tones like browns, taupes, and grays are your allies in creating depth and dimension for your eyes while maintaining a professional appearance.

Step 4: Building the Transition Shade

Using your trusty fluffy blending brush, begin by applying a light, matte eyeshadow shade that is slightly darker than your skin tone to your crease. This initial application acts as your transition shade, facilitating a seamless gradient as you introduce darker colors.

Step 5: Adding Depth with a Mid-Tone Shade

Now, reach for a mid-tone matte eyeshadow shade from your palette. Apply this shade to the outer half of your eyelid, expertly blending it into your crease. Concentrate the color on the outer corner of your eye to create a sense of depth and dimension.

Step 6: Crafting the Outer V

For that signature smoky effect, turn to a darker matte eyeshadow shade—one that’s a shade or two darker than your mid-tone choice. Employ a precise brush to apply this darker hue in a “V” shape at the outer corner of your eye. Extend it slightly into the crease and blend meticulously to avoid harsh lines.

Step 7: Liner Application with Subtlety

Opt for an eyeliner in a subtle hue like brown or gray to maintain a softer look for the office. Carefully line your upper lash line, ensuring that you stay close to the lashes. If you desire a balanced appearance, consider lining the outer two-thirds of your lower lash line. A gentle smudging of the liner will enhance the smoky effect.

Step 8: Illuminating the Inner Corners

To brighten your eyes and counterbalance the smoky drama, apply a small amount of light, shimmery eyeshadow, or a highlighter to the inner corners of your eyes.

Step 9: Lash Curling and Mascara Application

To open up your eyes, use an eyelash curler to give your lashes a lift. Then, apply mascara generously to both your upper and lower lashes to achieve a polished finish. If you prefer a softer look, consider using brown mascara.

Step 10: The Final Touches and Cleanup

Before you conclude your smoky eye masterpiece, take a moment to clean up any stray eyeshadow fallout or smudged liner. This meticulous step ensures a precise and professional appearance.

Conclusion: Embrace the Subtle Smoky Eye

Creating a smoky eye that’s suitable for the workplace doesn’t have to be a daunting task. By selecting the right shades and diligently following these easy-to-understand steps, you can achieve a smoky eye that exudes sophistication and allure while remaining entirely appropriate for professional settings. Remember, the key to adapting bold makeup looks for the office is subtlety. With practice, you’ll master the art of the office-ready smoky eye, radiating confidence and effortless glamour at work. Elevate your makeup skills and showcase your unique style while adhering to office standards.

Ultimate Guide to Natural Makeup

The Ultimate Guide to Natural Makeup

Achieving a natural or no-makeup makeup look is universally appealing. When done right, it means your makeup seamlessly blends into your skin, focusing on using products with the right texture for your skin type rather than precision. The goal of natural makeup is to enhance your features, giving you a fresh and effortless appearance.

How to Perfect Under-Eye Concealer for a Natural Look

Begin your makeup routine with proper skincare. Apply a small amount of eye cream or moisturizer before using under-eye concealer to hydrate and plump the area. You may discover that moisturizing alone eliminates the need for concealer. However, if you do use concealer, well-hydrated skin will ensure smoother application. Keep in mind that concealer for brightening the under-eye area is different from concealer for concealing blemishes.

3 Tips for Applying Under-Eye Concealer

  1. To counteract bluish or purple under-eye shadows, opt for a peachy or yellow-toned concealer, regardless of your skin tone.
  2. For a seamless, natural look, blend under-eye concealer using your fingertips, or for more coverage, use a makeup brush or sponge.
  3. Set your under-eye concealer with a light dusting of powder, especially if you plan to wear eyeliner or mascara to prevent smudging.

Achieving a Natural Eyeshadow Look

For natural eyeshadow, warm neutral shades work well for everyone and offer versatility. Aim for textures and finishes that aren’t overly matte or shimmery. A basic natural eye look involves three shadows: light, medium, and dark neutral shades that match your skin tone. You may find all three shades in a natural eyeshadow palette.

When Applying Eyeshadows

  • Use the lightest shadow as a base all over the lid to reduce oiliness and even out the eyelid tone.
  • Apply the mid-tone shadow on the visible lid below the crease for added depth.
  • Use the darkest shadow for extra definition along the lash line or when creating a smoky eye.

5 Tips for Applying Eyeshadow

  1. Before applying, tap off any excess powder from your eyeshadow brush to prevent fallout.
  2. Step back from the mirror between each step of your eye makeup to ensure your shadow and liner placement align with your desired look.
  3. Keep cotton swabs handy for fixing small mistakes or picking up fallen shadow.
  4. If you have mature skin or fine lines around your eyes, use an eye primer to prevent creasing.
  5. Opt for eyeshadow with a subtle shimmer or satin finish for a natural look on mature skin.

Creating a Natural Eyeliner Look

Eyeliners are available in various shades, but black, navy or brown eyeliners define your eyes and complement your eye color without appearing overly trendy. Incorporating eyeliner into a natural makeup look can be challenging. To achieve the best results, choose an eyeliner that complements your eyeshadow and avoid applying it to the waterlines.

7 Tips for Applying Eyeliner

  1. Warm up an eye pencil by rubbing it over the back of your hand to ensure smooth application.
  2. For liquid eyeliner, store pens tip-side down and shake them if needed.
  3. With gel eyeliner, use a fine-point brush and avoid picking up excessive product to prevent clumps.
  4. Apply eyeliner as close to your lash line as possible by looking downward in a mirror or gently tugging your eyelid upwards.
  5. Eyeliner placement can affect your eye shape, so keep it on your eyelid for a natural definition.
  6. Cotton swabs are useful for softening harsh lines or correcting liner mistakes.
  7. For mature skin, consider a smudgy pencil or gel liner topped with dark eyeshadow for a softer, organic look.

Achieving Natural-Looking Eyelashes

If your lashes don’t naturally curl, use an eyelash curler before applying mascara to lift them. Black mascara typically works best for a natural lash look. The choice of mascara formula and wand shape is a matter of personal preference, with options for lengthening, volumizing, or curling.

5 Tips for Applying Mascara

  1. Keep clean spoolie brushes on hand to separate lashes immediately after applying mascara.
  2. Wipe excess mascara from the wand’s tip before application to prevent clumping.
  3. Look downward when applying mascara to get the wand close to your lash roots without smudging.
  4. After applying mascara, gently lift your lashes with a finger to set them into a curl as the mascara dries.
  5. To prevent mascara smudging on your lower lashes, apply a small amount of powder under your eyes using a flat foundation brush or a fluffy eyeshadow brush. Consider waterproof or tubing mascara if smudging remains an issue.

Achieving Natural Eyebrows

Various brow products are available to define your eyebrows. Fill in your brows with an eyeshadow or brow powder matching your brow color, using an angled brow brush and a spoolie. Brow pencils and gels are also versatile options. If using a pencil, ensure it has a fine point, and keep it sharpened. Brow gel darkens and shapes your brow hairs, while brow wax provides a stronger hold.

4 Tips for Defining and Shaping Your Brows

  1. Always work from the inner brow towards the ends, following the direction of your natural hair growth.
  2. After filling in your brows with powder or pencil, brush through them with a spoolie to blend and soften any harsh lines.
  3. If your brows appear too filled or dark, use a small amount of face powder with a spoolie to diffuse the color.
  4. Ensure that your inner brow lines up with the inner corner of your eye, and the arch is three-fourths of the way across your eye when defining the tail end.

Interested in Learning More About Makeup and Beauty?

Whether you’re already knowledgeable about makeup brushes or seeking advice on adding glamour to your daily routine, gaining expertise in the beauty industry requires knowledge and practical experience. No one understands makeup better than the renowned makeup artist Shilpi Bhatia, known as the best makeup artist in Delhi. She built a successful career and a multi-brand with one simple philosophy: Be who you are. In Shilpi Bhatia’s MasterClass on Makeup and Beauty, you can learn how to create the perfect smoky eye, find the best makeup routine for the workplace, and receive valuable advice for aspiring makeup artists. Sign up for makeup artist courses and makeup classes to enhance your skills and knowledge.